Guide: Relocating Installed Software Between Drives Using Windows 11

Guide: Relocating Installed Software Between Drives Using Windows 11
Quick Links
- Things to Do Before Relocating Programs or Games
- How to Transfer Apps From One Drive to Another Through the Settings App
- How to Use the Command Prompt to Relocate Apps You Can’t Move From Settings
- How to Relocate Games Installed Through Gaming Clients
- Things Not to Do When Relocating Apps
Key Takeaways
- Before relocating programs, take a few precautions: create a System Restore point, back up your app files, and free up storage space on the destination drive.
- To move an app, head to Settings > Apps > Installed Apps. Click the three dots, choose “Move,” pick the new drive, and confirm with “Move” again. In cases where this method is not applicable, use the “robocopy” and “link” commands in the Command Prompt to relocate apps.
- For games installed via a gaming client, use the client’s built-in feature for secure and swift relocation.
Running out of storage space on a drive and considering moving some games or apps to another location? Or have you accidentally installed a game on the wrong drive and want to move it? Fortunately, relocating apps and programs between drives is super easy. We’ll show you how to do just that.
Things to Do Before Relocating Programs or Games
Before moving apps and programs between drives, take a few precautions to avoid file corruption, data loss, or other issues.
First, create a system restore point , especially if you’re transferring files from/to the drive housing your operating system. If you end up corrupting the system files while relocating apps or programs, a restore point can help you restore the operating system to working condition.
It’s important to note that a system restore doesn’t create a backup of the app being relocated, so you’ll need to do that separately. Back up your game or program on an internal or external drive. For even more safety, you can back it up on a secure cloud storage platform where it remains safe in case of any mishap on your device.
Also, ensure your laptop is sufficiently charged, and if you’re using a desktop PC, it’s worth checking for potential electrical outages in your area. Besides that, confirm that the destination drive—where you’re going to relocate an app—has ample space to accommodate the relocated program. If space is limited, take the necessary measures to free up storage .
How to Transfer Apps From One Drive to Another Through the Settings App
The most straightforward way to relocate an app or program to a different location is to use the Move feature within the Windows Settings app. Right-click on the Start button and select “Settings.”
Then, navigate to the “Apps” tab on the left and go to “Installed Apps” on the right. Here, you’ll find all of your installed applications.
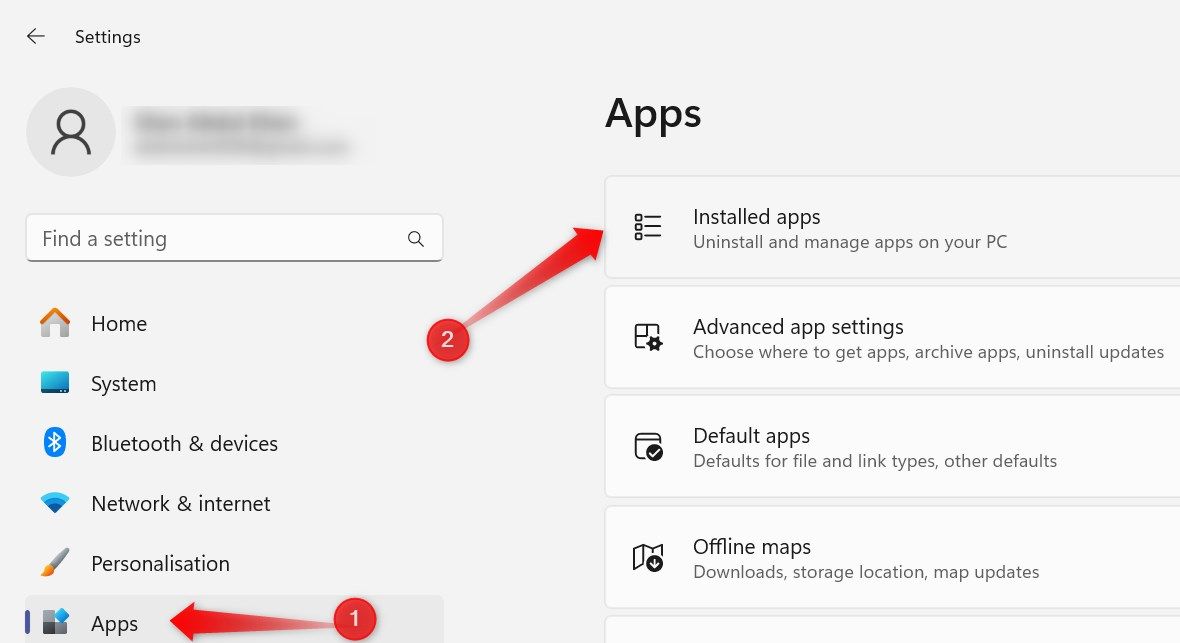
Find the app or program you intend to move, click on the three horizontal dots next to it, and click the “Move” option.

Windows will display the program’s current installation location and the drives that you can transfer the program to. Select your preferred drive, and then click on “Move.”
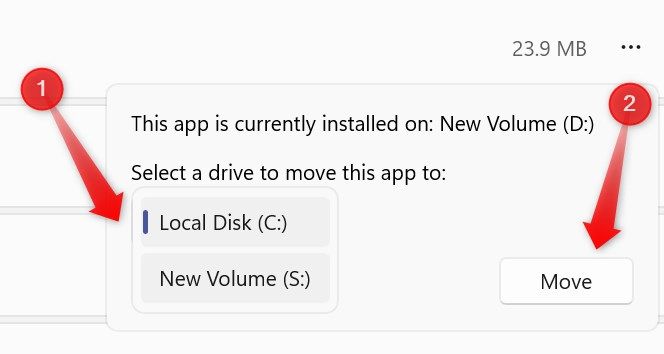
Wait a few seconds, and Windows will seamlessly move your app to the newly selected location.
While this is the most direct way to relocate apps, it may not be universally applicable. You may not see this option for some apps, or it might be grayed out. So how do you move those apps?
How to Use the Command Prompt to Relocate Apps You Can’t Move From Settings
You can relocate any app or program using the Command Prompt. First, locate the installation directory of the program you wish to relocate. If uncertain about the location, use Windows Search to find the app. Type the app name in Windows Search, right-click on the app, and select “Open File Location.” This will direct you to the Start Menu folder.
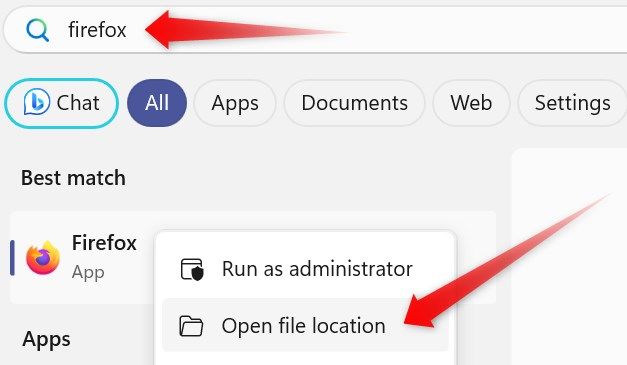
Right-click the app icon again and select “Open File Location.” This will lead you to the program’s actual installation location.
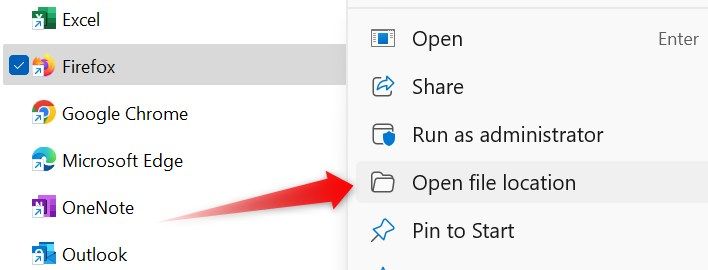
Copy and paste the program’s installation folder path into a Notepad file. We’ll use the term “old” to refer to this path.
Afterward, navigate to the drive where you intend to relocate the app. Create a folder specifically for the app within that drive, copy the path of this newly created folder, and paste it into the same Notepad file. We’ll use the term “new” to refer to this path.

Having noted both your “old” and “new” paths, open the Command Prompt with administrative privileges . Type “Command Prompt” into Windows Search, and click “Run as Administrator.” You can also use PowerShell run admin for this.
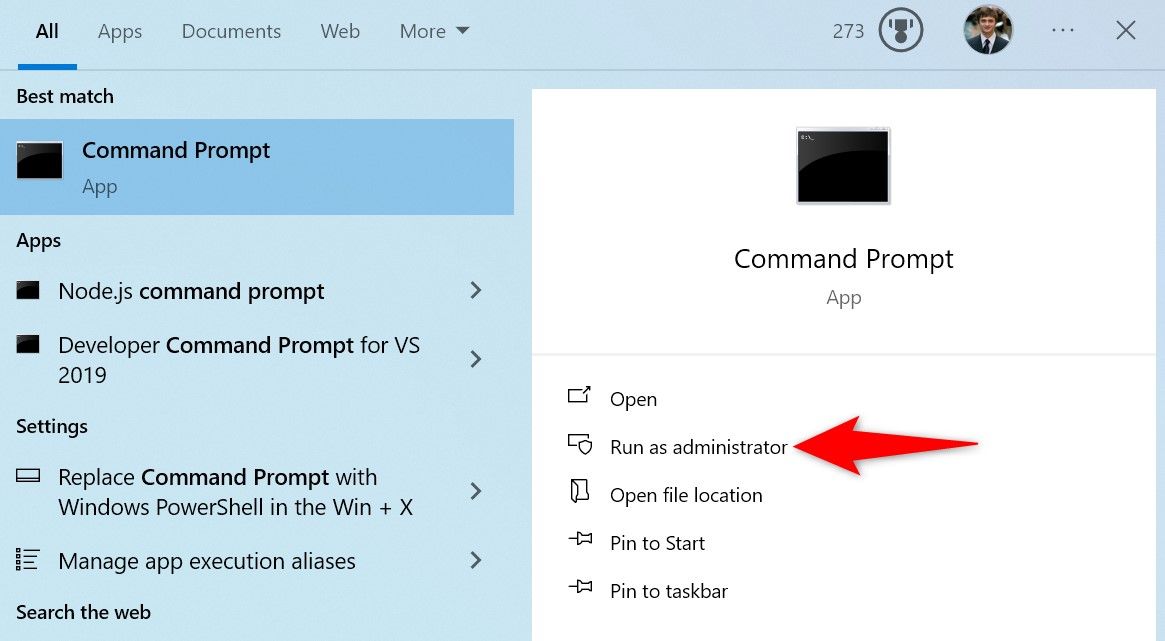
You need to input your “old” and “new” paths into the following command:
`robocopy "old" "new" /sec /move /e`
Copy and paste this command into the Command Prompt and press Enter. This command will move your specified app from its old location to the new one.
As a concrete example on our PC, we pasted the following command. Yours will be different.
`robocopy "C:\Program Files (x86)\Mozilla Firefox" "S:\Apps\Firefox" /sec /move /e`
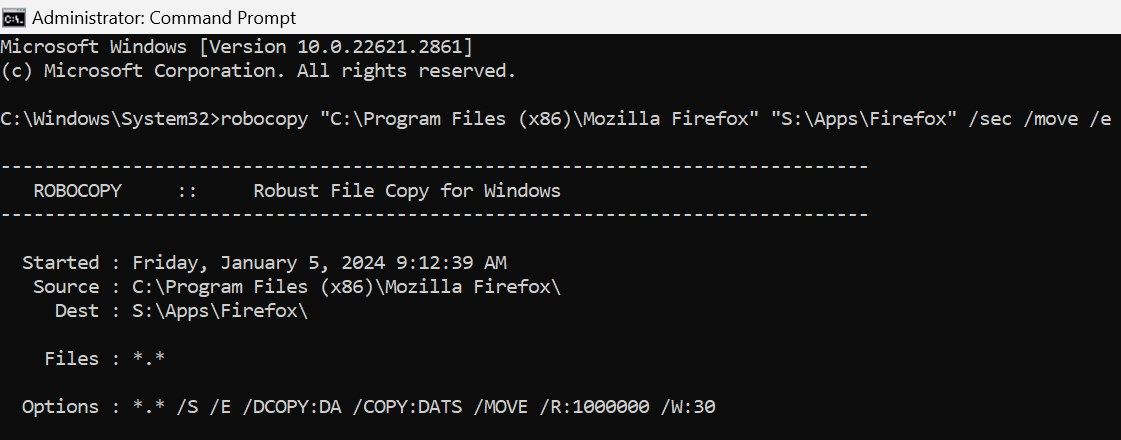
Following that, insert both the “old” and “new” paths into the following command:
`mklink "old" "new" /j`
Paste this command into the Command Prompt and hit Enter. This will establish symbolic links or hard links between files or directories. This ensures that any app shortcuts, possibly still pointing to the old location, function seamlessly.

The above process doesn’t automatically remove the app from its old location. So, after successfully relocating the app to a new location and creating a junction between the old and new directories, manually delete the app to free up storage space.
If you encounter an error message stating, “Cannot Create a File When That File Already Exists,” when running the mklink command, delete the app from the old location.
How to Relocate Games Installed Through Gaming Clients
Most popular gaming clients have a built-in feature to transfer installed games between drives directly. If you want to relocate a game installed through a gaming client, there’s no need to use any of the previously mentioned methods. Instead, use the built-in app relocation feature in the gaming client, which is highly secure and works much faster.
If you want to move games installed through the Steam client , you should use Steam itself to do so—it handles everything automatically. If you use a different client, refer to its official website for instructions.
Not every gaming client, like the Epic Games Launcher, provides a built-in feature for relocating games between different drives. You may have to move them manually.
Things Not to Do When Relocating Apps
You should strictly avoid taking a few actions when relocating apps from one drive to another. First, refrain from updating your Windows device. Secondly, don’t install another program while the relocation process is ongoing. Besides that, don’t run the app that is being relocated, avoid making alterations to the drives involved in the relocation, and don’t modify the settings of those drives.
Also, it goes without saying that you must not mistakenly shut down or restart your Windows device while relocating apps and programs if you don’t want to lose or corrupt app files.
That’s how you can seamlessly move apps and programs between drives. Just remember to back up your app data before starting the relocation process. Note that Windows doesn’t allow you to transfer apps in bulk. To do that, you’ll have to use third-party software. So, opt for a trusted and reputable software solution if you take this route.
Also read:
- [New] Dynamic Unpriced Visual Bonding Games for 2024
- [Updated] Expert Strategies in Post-Processing Colors for 2024
- 拼接Digiarty: 專業的電子商務建設指南
- Diving Deeper Into App Distribution - A Face-Off Between Apple's App Store and Google Play
- In 2024, Ideal Modeling Software for Animation Professionals
- Kicking Off Innovation: Apple Vision Pro and Its Impact on Dev Community Unveiled in Latest Developer Lab Session - Digital Trends
- Revive Your Gaming Experience: Top 7 Fixes for the Persistent Steam Black Screen Issue
- Rework Your World with ChatGPT: From Chaos to Calm, Clarity to Joy
- Should You Consider Getting AppleCare+ for Your Device?
- The Ultimate Guide: Steps to Gain Authenticity Badge on Instagram
- Ultimate Guide to Using WinX DVD Software: Expert Instructions & Strategies
- What To Do When Vivo Y27s Has Black Screen of Death? | Dr.fone
- Title: Guide: Relocating Installed Software Between Drives Using Windows 11
- Author: Robert
- Created at : 2025-02-03 16:06:17
- Updated at : 2025-02-07 16:05:52
- Link: https://techtrends.techidaily.com/guide-relocating-installed-software-between-drives-using-windows-11/
- License: This work is licensed under CC BY-NC-SA 4.0.