Easy Methods to Determine Installed Java Versions in Windows 11 Systems

Easy Methods to Determine Installed Java Versions in Windows 11 Systems
Quick Links
- Check Your Java Version Graphically
- Check Your Java Version Using the Command Prompt
- Check Your Java Version Using PowerShell
Key Takeaways
- You can check your Java version graphically by searching for “About Java” or “Configure Java” in the Start menu and clicking the top result.
- If you want to check your Java version in a command-line interface, open Command Prompt or PowerShell, then enter “java -version” in the console.
Some apps require you to run a certain Java version to properly function. You can check which version of Java you have installed using a graphical tool or via the command line.
Check Your Java Version Graphically
If you prefer to avoid the command line, you can use the About Java utility to find the installed Java version.
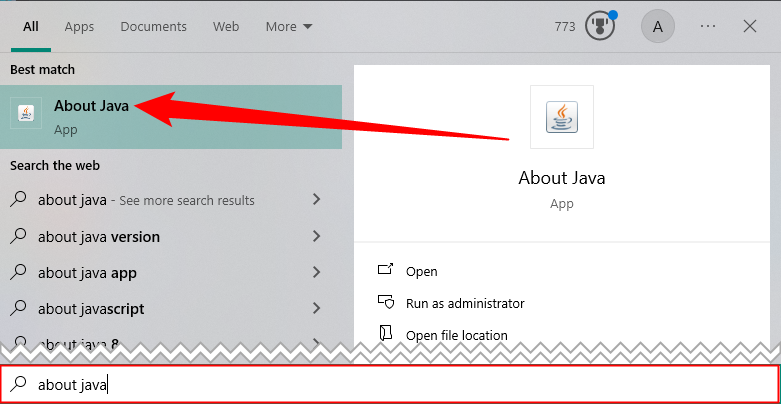
To use this method, open the “Start” menu, search for “About Java,” then click the first result.

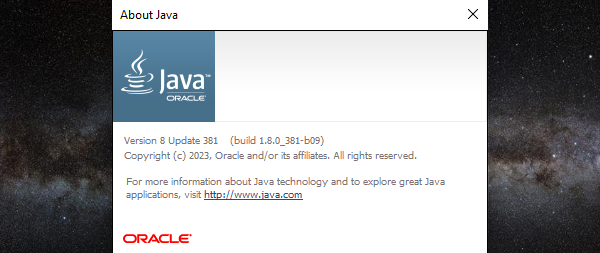
Here, you’ll see your current Java version listed in the first line.

If you don’t see About Java in the Start menu, search for “Configure Java” instead and click it. Then click “About” to see your Java version.
If you don’t see either the About Java or Configure Java tools, you likely don’t have Java installed. You can download it from Oracle’s official website.
Check Your Java Version Using the Command Prompt
You can check your Java version from the Command Prompt, too.
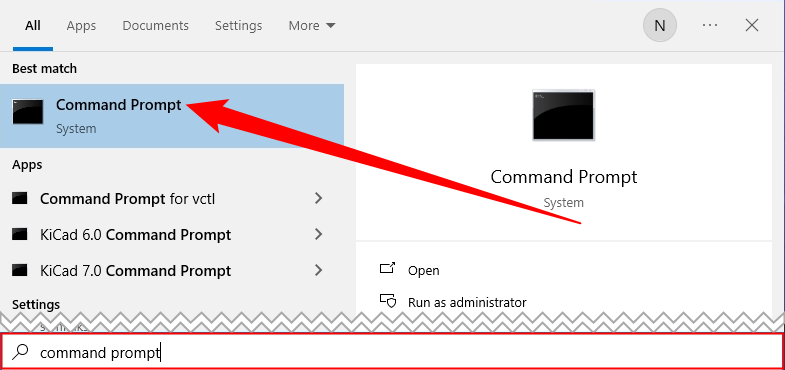
To begin, open the Start menu, search for “Command Prompt,” then click the “Command Prompt” shortcut in the search results.

When the Command Prompt opens, type the following command at the prompt and press “Enter.”
java -version
You’ll see “java version” and some numbers next to it. These numbers are your Java version.

If the Command Prompt says that Java is not recognized as an internal or external command, that’s probably because the system variables are not properly set—or perhaps because you don’t have Java installed. Reinstall Java on your PC and this should fix the issue for you.
Check Your Java Version Using PowerShell
Checking your Java version in PowerShell is basically the same as Command Prompt. First, open the Start menu and search “powershell,” then click the top result to launch PowerShell.

Type java -version into the window and hit Enter. Information about your Java version will be dispayed below.

Information about Java displayed in PowerShell.
It is important to note that this only shows you the version of Java you have on your system PATH . It is possible to have multiple versions of Java installed concurrently, but this command will only display one.
If you use Ubuntu alongside Windows, there’s a command that you can use to check whether Java is installed on your Ubuntu-based computer . And if it’s not, you can install it fairly easily.
Also read:
- [Updated] 2024 Approved Directly Connect YouTube Tunes to iMovie Seamlessly
- [Updated] 2024 Approved Grasping the Full Potential of Animoji on iPhone X
- Enduring Power Played Out in Asus TUF Gaming A14: An In-Depth Review
- Fixing the Autofocus Problem on Your iPhone - Top Solutions Explored
- Prime Locations to Find Rich Text Enhancements
- The Ultimate DIY Guide: Resolving Device Launch Problems Caused by Error Code 10
- Tom's Hardware - Expert Gadget Reviews & Tech Insights
- Windows 11 User's Handbook: Taking Effective Screenshots Using 4 Simple Tricks
- WWDC 2025 Highlights: Apple's Latest Innovations Unveiled
- Title: Easy Methods to Determine Installed Java Versions in Windows 11 Systems
- Author: Robert
- Created at : 2025-02-04 16:09:28
- Updated at : 2025-02-07 16:16:08
- Link: https://techtrends.techidaily.com/easy-methods-to-determine-installed-java-versions-in-windows-11-systems/
- License: This work is licensed under CC BY-NC-SA 4.0.